 Weird Stuff
Weird Stuff
Weird Stuff  Mysteries
 10 Tragic Disappearances and Deaths in Joshua Tree National Park
 History
 10 Ways Childhood Really Sucked in the Old West
 Music
Music 10 Name Origins of Famous Bands from the 1990s
 Religion
 10 Biggest Turnarounds by the Catholic Church
 Weird Stuff
 10 Unbelievable Times Laws Had Unintended Consequences
 Humans
 Ten Historic Women Who Deserve Way More Credit Than They Got
 Movies and TV
 10 Films That Spawned Major Lawsuits
 History
 Ten Times Towns Were Wiped Off the Face of the Earth
 Creepy
 10 of the Most Disturbingly Haunted Public Houses in the UK
Weird Stuff 10 Niche Subcultures That Are More Popular Than You Might Think
Mysteries 10 Tragic Disappearances and Deaths in Joshua Tree National Park
History 10 Ways Childhood Really Sucked in the Old West
Who's Behind Listverse?

Jamie Frater
Head Editor
Jamie founded Listverse due to an insatiable desire to share fascinating, obscure, and bizarre facts. He has been a guest speaker on numerous national radio and television stations and is a five time published author.
More About Us
Music 10 Name Origins of Famous Bands from the 1990s
Religion 10 Biggest Turnarounds by the Catholic Church
Weird Stuff 10 Unbelievable Times Laws Had Unintended Consequences
Humans Ten Historic Women Who Deserve Way More Credit Than They Got
Movies and TV 10 Films That Spawned Major Lawsuits
History Ten Times Towns Were Wiped Off the Face of the Earth
Creepy 10 of the Most Disturbingly Haunted Public Houses in the UK
Top 10 Coolest Home Science Experiments
Science isn’t something that necessarily needs to be done in the closed quarters of a lab. Many of the most brilliant experiments can be done in your own home and literally cost you almost nothing to make! So, just by using a bit of household equipment and items you would likely have anyway spend some time impressing your friends with a few of these! Here are ten of the most impressive!
10. The Homemade Volcano
Everyone at one time or another has constructed one of the most tried and true home science experiments: The Volcano. This is a simple and really impressive use of household acids and bases that can be made again and again.
What you’ll need:
A small empty plastic pop bottle (500 mL)
A funnel
Two measuring cups
1 cup of baking soda
1 cup of vinegar
1 tsp of Sunlight liquid dish detergent
Food coloring (optional)
Glitter (optional)
What to do:
1. Place the pop bottle in the bottom of your kitchen sink.
2. Insert the funnel into the pop bottle.
3. Pour the baking soda into the bottle using the funnel.
4. Add the dish detergent and the food coloring to the vinegar in the measuring cup.
5. Sprinkle some glitter on top of the baking soda.
6. Pour the vinegar mixture into the bottle and watch as your volcano erupts.
9. Rock Candy
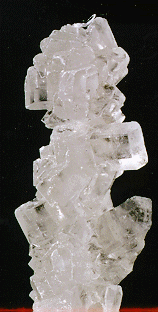
Who doesn’t love sucking on a nice piece of hard candy? Well, why not make your very own at home! It only requires a few simple ingredients and just a little time and patience. Here is how to do it:
You will need
15cm piece of string
A pencil
A paper clip (or large plastic bead)
1 cup of water
2 cups of sugar
A glass jar
What to do
Tie the 15-cm piece of string to the middle of the pencil.
Tie the paper clip (or bead) onto the end of the string.
Put the pencil across the top of a jar so that the string hangs down the middle of the jar. If it hangs down too far, roll the string around the pencil until the string is not touching the sides or bottom of the jar. The string will act as a seed for the crystal. Any type of jar will do, but canning jars are best since they can endure the hot temperatures. Tall skinny olive jars are also nice because they don’t use up so much of the liquid.
Now that the string and pencil are ready remove them from the jar and put them aside.
Pour the water into a pan and bring it to boil.
Pour about 1/4 cup of sugar into the boiling water, stirring until it dissolves.
Keep adding more and more sugar, each time stirring it until it dissolves, until no more will dissolve. This will take time and patience and it will take longer for the sugar to dissolve each time. Be sure you don’t give up too soon.
Carefully pour the hot sugar solution into the jars to the top. Then submerge the paper clip and string into the sugar solution. Be sure the string hangs down in the middle of the jar.
Allow the jar to cool and put it someplace where it will not be disturbed. In a week or so you will have large crystals to enjoy!
8. Miniature Hovercraft
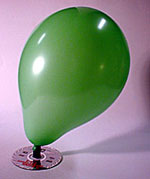
So you want your very own hovercraft? Of course it’s only big enough to hold a mouse or two, but it’s still pretty neat. Well, here’s what you are going to need for this experiment:
Cardboard
Pencil
Glue
Paper
Thread Spool
Balloon
Mouse (optional)
Cut a 4-inch square out of the cardboard.
Punch a hole in the cardboard. Make sure you punch the hole in the center of the cardboard. The hole should be the same size as the hole in the spool.
Glue the spool to the cardboard on top of the hole. Make sure you glue it really well and the holes line up. Make sure you use enough glue to seal it so that no air can escape between the spool and the piece of cardboard.
Cover the top of the spool with a circle of paper – glue it to the spool and wait until the glue is dry.
Punch a hole in the middle of the paper cover where the hole of the spool is. Now your hole should run through the paper, spool, and cardboard without any obstructions.
Blow up the balloon and twist the end to keep the air from escaping. Stretch the balloon over the top of the spool.
Make sure your mouse is well protected (optional step).
Set the hovercraft on a level table. Let go of the balloon.
7. Homemade Silver Polish
If you have any objects made from silver or plated with silver, you know that the bright, shiny surface of silver gradually darkens and becomes dull and unappealing. This happens because silver undergoes a chemical reaction with sulfur particles in the air. You can use chemistry to reverse the tarnishing reaction, and make the silver shiny again!
For this experiment you will need:
a tarnished piece of silver
a pan or dish large enough to completely immerse the silver in
aluminum foil to cover the bottom of the pan
enough water to fill the pan
a vessel in which to heat the water
hot pads or kitchen mitts with which to handle the heated water vessel
baking soda, about 1 cup per gallon of water
Line the bottom of the pan with aluminum foil. Set the silver object on top of the aluminum foil. Make sure the silver comes in full contact with the aluminum.
Heat the water to boiling. To the hot water, add about one cup of baking soda for each gallon of water. (If you need only half a gallon of water, use half a cup of baking soda.) The mixture will froth a bit, no worries.
Pour the hot baking soda and water mixture into the pan, and completely cover the silver.
Almost immediately, the tarnish will begin to disappear. If the silver is only lightly tarnished, all of the tarnish will disappear within several minutes. If the silver is badly tarnished, you may need to reheat the baking soda and water mixture, and give the silver several treatments to remove all of the tarnish.
6. Homemade Electromagnet

Making an electromagnet at home is fun and easy. Most magnets, like the ones on many refrigerators, cannot be turned off; they are called permanent magnets. This one can be and is therefor called an electromagnet. They run on electricity and are only magnetic when the electricity is flowing. The electricity flowing through the wire arranges the molecules in the nail so that they are attracted to certain metals.
You will need:
A large iron nail (about 3 inches)
About 3 feet of THIN COATED copper wire
A fresh D size battery
Some paper clips
What to do:
1. Leave about 8 inches of wire loose at one end and wrap most of the rest of the wire around the nail. Try not to overlap the wires.
2. Cut the wire (if needed) so that there is about another 8 inches loose at the other end.
3. Now remove about an inch of the plastic coating from both ends of the wire and attach the one wire to one end of a battery and the other wire to the other end of the battery. (It is best to tape the wires to the battery – be careful though, the wire could get very hot!) Now you can experiment by picking up paper clips and small non-aluminum objects.
5. Soda and Mentos Geyser
Watching a jet of foamy soda erupt from a bottle is not only fun, but also hysterical and will impress everyone around you… while hopefully not getting them (and yourself) too messy in the process. This also happens to be a really inexpensive home experiment, but you might want to invest in several bottles of soda and a bunch of rolls of mints just in case.
Step one: Open the 2-liter pop bottle (note: diet soda seems to work better and is less sticky come clean-up time)
Step two: Unroll the package of Mentos and prepare to dump the entire pack in at once. Fashioning a tube out of an empty toilet paper roll to just fit into the bottle mouth is very helpful.
Step three: Drop the mints in and back up a few paces… quickly!
Step four: The geyser is quite impressive and the current measured record is 21 feet!
4. Homemade Plastic
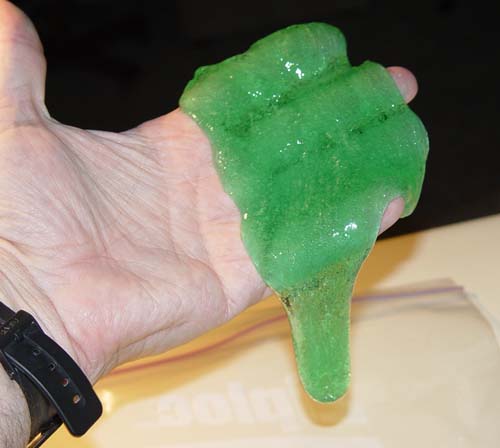
Plastics are all around us. There are many different kinds, with a wide range of properties. Some are hard, others are soft. Some are transparent, others are opaque. Most plastics are made in factories, but here’s one you can make at home!
For this experiment you will need:
1 teaspoon (5 cm3) laundry borax
1 tablespoon (15 mL) white glue (e.g., Elmer’s Glue-All)
food coloring (optional)
two cups
spoon
water
Here’s what to do:
In one of the cups, dissolve 1 teaspoon of laundry borax in 5 tablespoons (75 mL) of water. You will need to stir this for a while to get it to dissolve. (If a tiny bit does not dissolve, that is fine, though.)
In the other cup, combine 1 tablespoon of water and 1 tablespoon of white glue. If you wish, you may color the mixture with a couple drops of food coloring. With a clean spoon, stir the mixture thoroughly until it is uniform.
Put 2 teaspoons of the borax solution from the first cup into the glue mixture in the second cup. Stir the mixture.
As you stir the mixture, it will stiffen into a soft lump. After the lump has formed, take it from the cup and knead it in your hand for a couple minutes.
3. Potato Clock
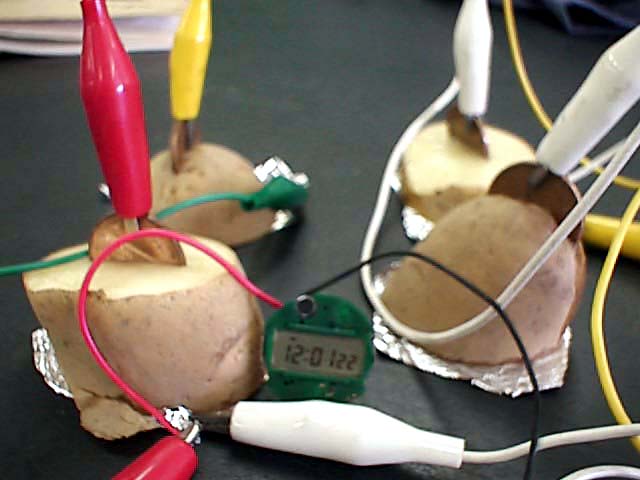
Everyone can get ahold of a few potatoes, and what better way to use them (aside from consumption, that is) than to make them into an operating clock? It’s easy and only requires the use of a few things many people have handy, or, if you need to go to the electronics store to purchase an LED clock anyway, you can get the alligator clips and electrodes there, as well.
To run it on two potatoes, you’ll need:
1. Two copper electrodes. A 10-cm length of thick (0.64 cm) copper ground wire
works well. You’ll find it at hardware and home supply stores.
2. Two zinc electrodes. Use large galvanized nails, also available from a hardware or home supply store.
3. Three alligator-clip wires
4. Two potatoes.
Now make a potato clock. Open the battery compartment of the clock and remove the button battery. In the compartment, notice that there are two connections
for the battery marked plus (+) and minus (-). You’ll connect the potato battery to these two places. Let’s call the potatoes A and B. Connect A and B to the clock like this:
1. Insert a copper electrode and a zinc electrode into each potato, fairly far apart.
2. Use an alligator-clip wire to connect the copper electrode of potato A to the plus (+) connection in the clock.
3. Use an alligator-clip wire to connect the zinc electrode of potato B to the negative (-) connection in the clock.
4. Use an alligator-clip wire to connect the zinc electrode of potato A to the copper electrode of potato B.
Viola! This clock will last for months especially if the potatoes are very fresh.
2. Kitchen-Grown Avocado Tree

Avocados are delicious and highly nutritious fruits and can be used in myriad ways, but what to do with the pit? Well, you could supply yourself with even more of the green delights by growing your own tree right in your kitchen!
Step One: Open the avocado and remove the pit from the center.
Step Two: Wash the avocado pit under cool running water and towel-dry.
Step Three: Carefully push three toothpicks into the thickest width of avocado, you want to push the toothpicks into the pit about a 1/2″ deep. The toothpicks will help suspend the avocado pit in water and keep the top part of the pit in fresh air and the fat base of the pit under the surface of the water.
Step Four: Suspend the pit over a glass filled with water. The toothpicks will rest on the rim of the glass and hold the pit in place so it doesn’t sink to the bottom. Always check the water level in the glass and see that the water is covering the fat base of the pit by about an inch depth. If the water is below that level you’ll need to add some more.
Step Five: Place the glass in a bright windowsill. In about three to six weeks the top of the avocado pit will begin to split and a stem sprout will emerge from the top and roots will begin to grow at the base.
When the stem grows to about five or six inches pinch out the top set of leaves. In another two or three weeks new leaves will sprout and there will be more roots.
It’s now time to plant the young avocado tree.
1. Rainbow in a Glass
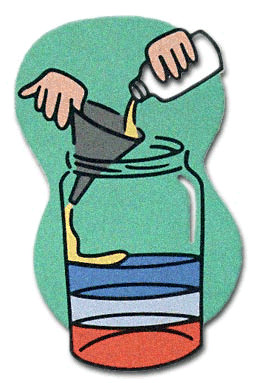
Try this at home: Have you ever seen the separate viscosities of liquids displayed like a fluid rainbow? Well, here is a simple way to take several household items and wow your friends and family alike with a beautiful use of such common materials! Remember to add each very slowly and to tint each clear liquid with some food coloring.
You will need the following materials:
1/4 cup (60 ml) dark corn syrup or honey
1/4 cup (60 ml) dishwashing liquid
1.4 cup (60 ml) water
1/4 cup (60 ml) vegetable oil
1/4 cup (60 ml) rubbing alcohol
a tall 12 ounce (350 ml) glass or clear plastic cup
two other cups for mixing
food coloring
More Great Lists
 Top 10 Outlandish Science Experiments Performed On Animals
 Top 10 Coolest Halloween Traditions Across America
 10 Coolest Airports In The World
 Top 10 Weird Experiments And Facts About Dairy
 Top 10 Scariest Government Experiments
 Top 10 Dirtiest Places In Your Home
 Top 10 Petty Arguments We All Have About Home Life
 Top 10 Hacks To Make Your Home Awesome
") Top 10 Cutest Animals In The World (According To Science)
Top 10 Cutest Animals In The World (According To Science)
fact checked by
Alex Hanton
More Great Lists