 Miscellaneous
Miscellaneous
Miscellaneous  Gaming
 10 Funny Tutorials in Games
 History
 10 Fascinating Little-Known Events in Mexican History
 Facts
Facts 10 Things You May Not Know about the Statue of Liberty
 Movies and TV
 10 Movie Adaptions That Brought Popular Songs to Life
 Health
 10 Miraculous Advances Toward Curing Incurable Diseases
 Miscellaneous
 10 Undeniable Signs That People’s Views of Mushrooms Are Changing
 Animals
 10 Strange Attempts to Smuggle Animals
 Travel
 10 Natural Rock Formations That Will Make You Do a Double Take
 Movies and TV
 10 Actors Hidden in Your Favorite Movies
Miscellaneous 10 Interesting Things Manufacturers Stopped Making and Why
Gaming 10 Funny Tutorials in Games
History 10 Fascinating Little-Known Events in Mexican History
Who's Behind Listverse?

Jamie Frater
Head Editor
Jamie founded Listverse due to an insatiable desire to share fascinating, obscure, and bizarre facts. He has been a guest speaker on numerous national radio and television stations and is a five time published author.
More About Us
Facts 10 Things You May Not Know about the Statue of Liberty
Movies and TV 10 Movie Adaptions That Brought Popular Songs to Life
Health 10 Miraculous Advances Toward Curing Incurable Diseases
Miscellaneous 10 Undeniable Signs That People’s Views of Mushrooms Are Changing
Animals 10 Strange Attempts to Smuggle Animals
Travel 10 Natural Rock Formations That Will Make You Do a Double Take
Movies and TV 10 Actors Hidden in Your Favorite Movies
10 Of The Most Embarrassing British Military Blunders
At one point in history, the sun never set on the British Empire. But it wasn’t always “Good show, ol’ chap!” and “I say, the Redcoats’ve won again.” Before, during, and after the British Empire reached its apex, Brits in both the army and the navy could be found all over the world, doing their very best to screw it all up.
10 The English Armada
1589
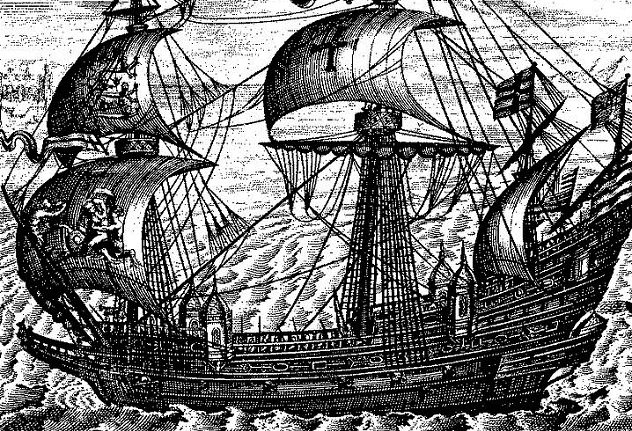
You’ve probably at least heard of the Spanish Armada, also known as the time Spain tried to invade England with one of the largest fleets ever assembled. And failed. Miserably. While Spain’s impotence and self-destruction remain impressive even today, with 100,000 rounds fired to no effect and over 60 ships lost on the return voyage, England has never been a nation to be outdone by its continental neighbors.
After Spain’s colossal failure, England formed an invasion armada of its own the next year. The first problem with the “English,” or “Counter-Armada,” was the full year it took to launch. Given a year’s lead time, the Spanish prepared and fortified potential targets along the Portuguese coast.
The second problem—a monumental one for an aspiring “armada”—turned out to be a shortage of transport ships to land the invaders on the Iberian coast. Sixty Dutch flyboats were commandeered before the invasion could begin. Things got worse on land, though. Disease decimated the English army, killing 10,000 and forcing the invaders to retreat, having achieved only the theft of some wine.
9 Medway
1667
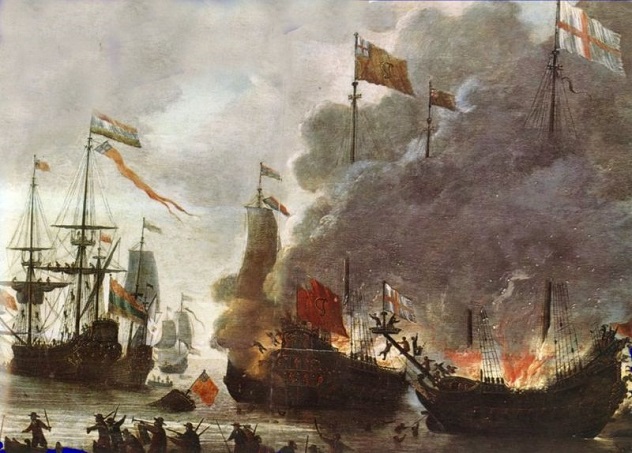
At the height of the Second Anglo-Dutch War, England was still reeling from the shock of the Great Fire, the Great Plague, and the great realization of “Holy crap, we’re broke!” The latter meant reduced hours for King Charles II’s men, including sailors, soldiers, and dockworkers. English insolvency made begging the Dutch for peace the only realistic strategic option.
With no money to pay their crews, the Royal Navy’s finest ships sat idle at the Chatham docks. For some reason, the Dutch weren’t interested in English peace offers and took the fight into England. The raid that followed defined “national humiliation” for the English.
Dutch raiders sailed up the River Medway essentially unopposed, unless you count some chains placed across the river and artillery unable to fire due to the cannonballs not fitting the barrels. The Dutch destroyed six ships and captured the pride of the English fleet, the Royal Charles. The ship of the line bearing the humiliated king’s name was towed to the Netherlands, where it was put on display as a spoil of war. Ultimately, the Dutch withdrew, fearing a trap due to the ridiculous lack of opposition.
8 Cartagena Las Indias
1741
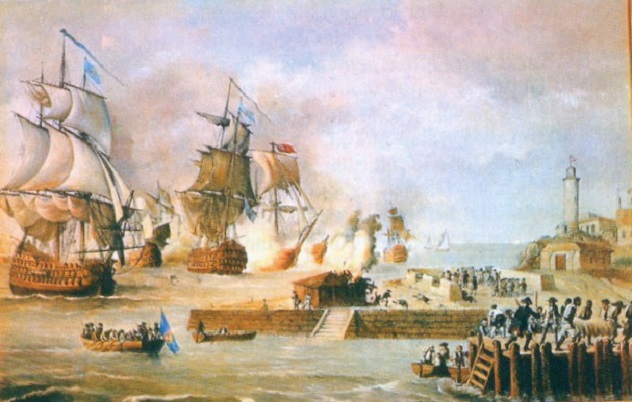
With a name like the War of Jenkins’ Ear, you must expect bungling of epic levels. The British siege of Cartagena does not disappoint. Before the British even sailed on the Spanish-Caribbean trading hub, the Brits had begun making victory medals.
The British sent 140 warships—manned by 15,000 sailors and over 11,000 soldiers—in an effort to overwhelm Cartagena’s six ships and 4,000 or so defenders. The British command underestimated the strength of the Spanish fortress and resolve of its one-eyed commander, Blas de Lezo. Squabbling within the British high command didn’t help matters, either. Frontal assaults on well-defended Spanish positions marked the highpoint of British strategy at Cartagena.
The British could not even decide when to retreat. All told, the British spent nearly two months at Cartagena and lost over 10,000 men as casualties of both Spanish guns and tropical diseases. The British then did their best to pretend the whole thing never happened. The pre-made victory medals might have been a sore spot.
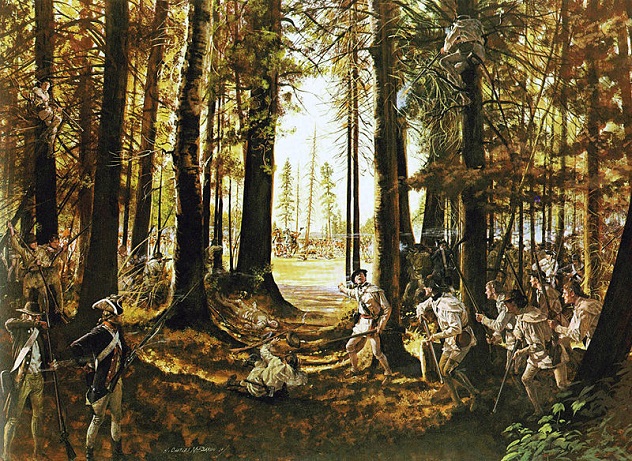
7 Braddock’s March
1755
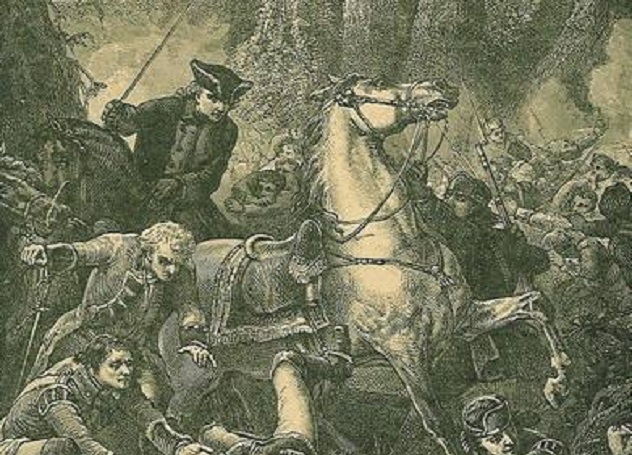
The plan was simple: General Braddock and 2,000 Redcoats were going to march from Maryland, capture the French-held Fort Duquesne in what is now Pittsburgh, and commence booting the French out of North America.
The problems began in Maryland. The colonists Braddock was ostensibly defending from French and Native raids didn’t feel like providing supplies, wagons, or aid of any sort. Only intervention from Benjamin Franklin helped get Braddock on the road—a 177-kilometer (110-mi) road that wasn’t wide enough to accommodate Braddock’s supply train.
Rather than choose a new route, Braddock’s column hacked a wider road out of the wilderness. Even then, the British force averaged a terrifically slow pace of 8 kilometers (5 mi) per day. As one might expect, the French received ample warning of the British advance. Since Braddock’s superior manner had alienated almost all of his Native scouts, the British were ripe targets for a surprise—which they got, in the form of a French force that shattered the British offensive and plunged North America into the Seven Years’ War.
6 Saratoga
1777
It made sense on paper: two British armies converging on the American rebels in Albany, then forcing a decisive battle in that hotbed of dissent, Philadelphia.
General Johnny Burgoyne would sweep southward from Canada, while General William Howe planned to march north from New York. After the easy capture of Fort Ticonderoga, Burgoyne ignored the safer maritime passage via Lake Champlain and inexplicably decided to march overland to Albany. Recalling shades of Braddock, Burgoyne spent weeks marching through the dense forest.
While Burgoyne struggled to Albany, Howe decided to go directly to Philadelphia without sending word to Burgoyne. When Burgoyne’s beleaguered force made it out of the woods, they collided with a well-prepared American army. Burgoyne drove the Americans from their position, but failed to press the advantage, believing that reinforcements were on the way. As the fighting dragged on, Burgoyne’s supplies dwindled. Rebel reinforcements surrounded the British and forced Burgoyne’s surrender.
Emboldened by the American victory, the French formally entered the war and swung the balance in favor of the rebels.
5 Isandlwana
1879
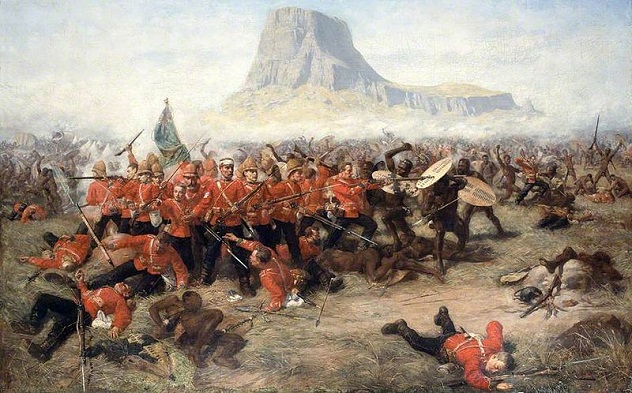
When the governor of British-controlled southern Africa decided he wanted to Anglicize some more Africa—specifically, lands belonging to the Zulu kingdom—Lord Chelmsford stepped up to lead the invasion force. Less than two weeks into the 1879 invasion, Chelmsford divided his army and took the majority of troops in pursuit of what he believed was the primary Zulu army based on questionable intel.
The remainder of the British column camped at Isandlwana, a rocky landmark jutting out from the surrounding plain. Shortly thereafter, a 20,000-strong Zulu force fell upon the British. Initially, the British formed a firing line, which held their attackers at bay. As fatigue set in, encirclement became a reality, so the British formed a series of shrinking defensive squares. British ammunition dwindled as the Zulu overran the British camp. By the time Chelmsford realized his mistake, over 1,300 of the 1,700 defenders lay dead.
For chasing glory at the expense of his command and ignoring several warnings about the danger to the Isandlwana camp, Chelmsford received multiple honors and a promotion.
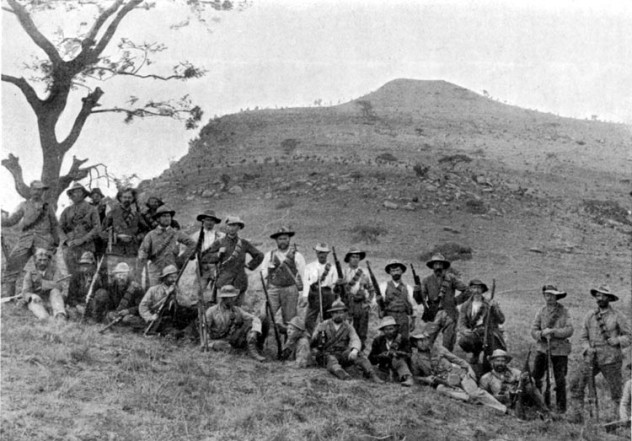
4 The Battle Of Majuba Hill
1881
The British really wanted a unified South African colony to rule. Of course, the Dutch Boers who had settled in the region centuries earlier weren’t about to give up their freedoms without a fight. The Boer republic of Transvaal declared its independence from British rule and mobilized its militia.
In an effort to make amends for earlier British defeats, General George Pomeroy-Colley intended to dislodge the Boers from Laing’s Nek, an important mountain pass. The British occupied Majuba Hill, which overlooked the Boer defenses, but neglected to fortify it in any way. The small size of the British force—about 400 infantry—failed to strike fear into the Boers. Instead, an approximately equal number of Boer militia stormed the hill.
The Boers’ marksmanship surprised the British, and before long, all the officers lay dead, including Colley. Boer riflemen poured such heavy fire onto the plateau that they were able to overrun the British position, killing or wounding 285 defenders at a loss of just six casualties. Unlike the Zulus, however, the Boers won both the battle and the war.
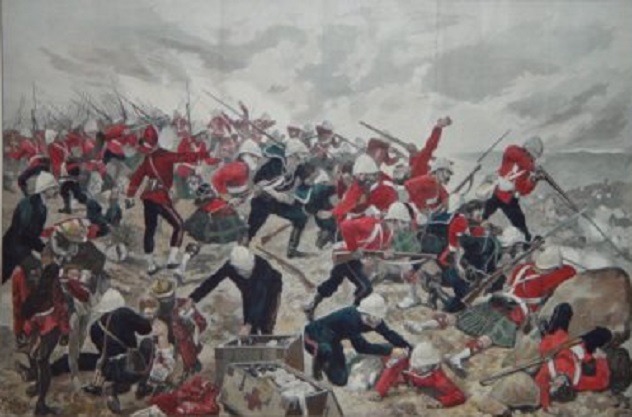
3 Spion Kop
1900
Two decades didn’t change the Boers’ minds about self-rule or independence, but the discovery of gold on Boer lands certainly heightened British enthusiasm for another South African war. The British spent the first several months of the Second Boer War the same way they ended the first—losing.
Across South Africa, British garrisons found themselves under siege. Twenty-thousand soldiers were sent to relieve the besieged in Ladysmith. The British engaged the Boers along a road to Ladysmith, eventually fighting their way to the top of a hill, Spion Kop. Amid a thick fog, the British believed they occupied the hill’s heights and had driven off the Boer troops.
When the fog cleared, the British realized their fatal error. Just in front of their position lay another, higher prominence, where the Boer were waiting. The trenches the British had dug earlier became shallow graves as Boer riflemen poured fire onto the British position. Despite the disastrous loss of as many as 1,600 men to the Boers’ 150, the British eventually recovered from Spion Kop and managed to win the war.
2 Singapore
1942
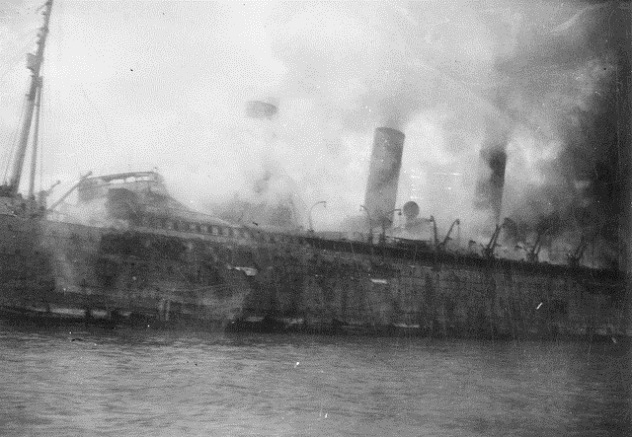
They called the naval base at Singapore “impregnable.” That seemed to be the extent of the British defensive strategy—hoping nicknames like “the Gibraltar of the East” obscured the glaring vulnerabilities of a naval base two decades in the making.
The bulk of the British defenses at Singapore were designed to ward off attacks from sea. Land defenses were minimal and anti-personnel artillery was in short supply. The combined allied force of 85,000 wasn’t nearly as well-trained as their Japanese counterparts, but then again, they outnumbered attacking Japanese forces nearly three to one.
A ferocious amphibious assault overwhelmed the British troops, many of whom quickly abandoned their positions to flee to the city. The Japanese were amazed at how easily they took Singapore. In the largest capitulation in British history, the Japanese took 80,000 British and Empire troops prisoner. Not quite the showing Winston Churchill demanded just a week prior to the British surrender, when he said “[the] battle must be fought to the bitter end at all costs.”
1 Dieppe Raid
1942
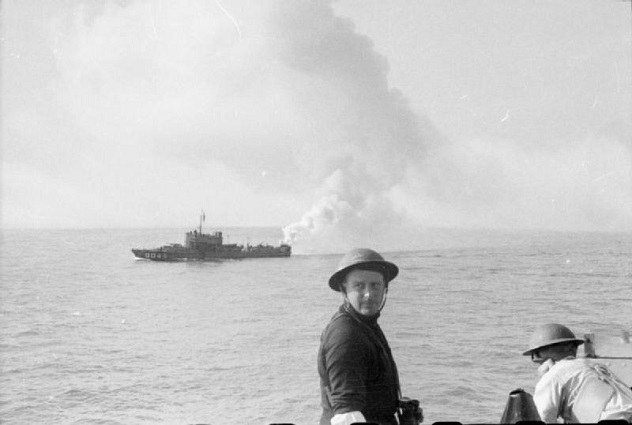
The disaster at Dieppe was a British attempt to gain a foothold in Nazi-occupied France and open a second European front. Dieppe (codenamed “Operation JUBILEE”) was D-Day minus the leadership, coordination, massive aerial bombardment, and constant artillery support which made that invasion a success.
The 6,000 Allied troops who struggled ashore at Dieppe on August 19, 1942 were supported by only a brief aerial bombardment and 10 minutes’ shelling from four destroyers. The minimal artillery and aerial support made so little an impression on the German defenders that some believed the Germans knew of the raid in advance.
The British-led and largely Canadian force struggled to advance from the beachhead as the rocky beach disabled Allied tanks. Successive assault waves arrived late, amplifying the grim situation on the beaches. German troops entrenched in the cliffs cut the Allied soldiers to ribbons. When the retreat finally commenced nine hours later, the Allies had suffered over 3,000 casualties, of which 1,900 were captured and 900 were killed.
Having wasted numerous Canadian lives for no gain, British commanders attempted to justify their blundering as a valuable lesson for future operations. As mea culpas go, the reality that your officer corps failed to recognize the need to bombard a coastal fortress before landing infantry may actually be scarier than fictional spies informing the enemy. Operation JUBILEE has less in common with D-Day and far more in common with the Bay of Pigs.
You can also find J. here.
More Great Lists
 Top 10 Bizarre Barbershop Blunders And Breakdowns
 Top 10 Costly US Presidential Campaign Blunders
 Top 10 Blunders That Will Go Down In History - 2020
 10 Weird, Hilarious, And Embarrassing Police Standoffs
 10 Embarrassing Moments From Legislative Houses
 10 Weird And Wonderful British Festivals
 10 Ruthless Moves From The British Royal Family
 10 British Crimes Stranger Than Fiction
 10 Weird British Christmas Traditions
fact checked by
Jamie Frater
More Great Lists